How to add a filter in Make and check what it blocks
Pass only matching data through a Make filter, map the right value, and inspect one accepted item and two rejected items in a safe manual test.
In this guide
A Make filter checks data on a connection before it reaches the next module. If the condition fails, that item stops there. You can use it to skip incomplete requests or act only on orders with the right status.
You will pass Pencil and block Notebook and Folder in one manual run. This small test uses no external app or customer data, so you can see exactly what the condition does before putting it in a real workflow.
You need an existing Make account, permission to edit a scenario and available credits. Free is enough for this exercise, with no trial. The desktop interface was checked on October 8, 2026.
Prepare three items, or reuse your Iterator test
If you already completed our Iterator guide, open that inactive test. It has the three modules we need; do not rebuild it.
Otherwise, create an inactive scenario called Filter check and add JSON → Parse JSON. Paste this into JSON string, leave Data structure unset and save:
{"items":["Notebook","Pencil","Folder"]}Run this one module once to make its output fields available. A warning that the starting module is also the last is expected for this temporary one-module test; proceed only for that warning, not an input error.
Add Flow Control → Iterator after JSON. Map JSON’s items[] token into Array and save. The Iterator sends each list item in a separate bundle, Make’s packet of data.
After it, add Tools → Set variable. Set Variable name to item and map the Iterator’s Value token into Variable value. Save. This safe output records each accepted item in the run inspector instead of sending it anywhere.
JSON: Parse JSON → Iterator → Tools: Set variableKeep the scenario inactive. You will use Run once, not a schedule.
Put the condition before the action
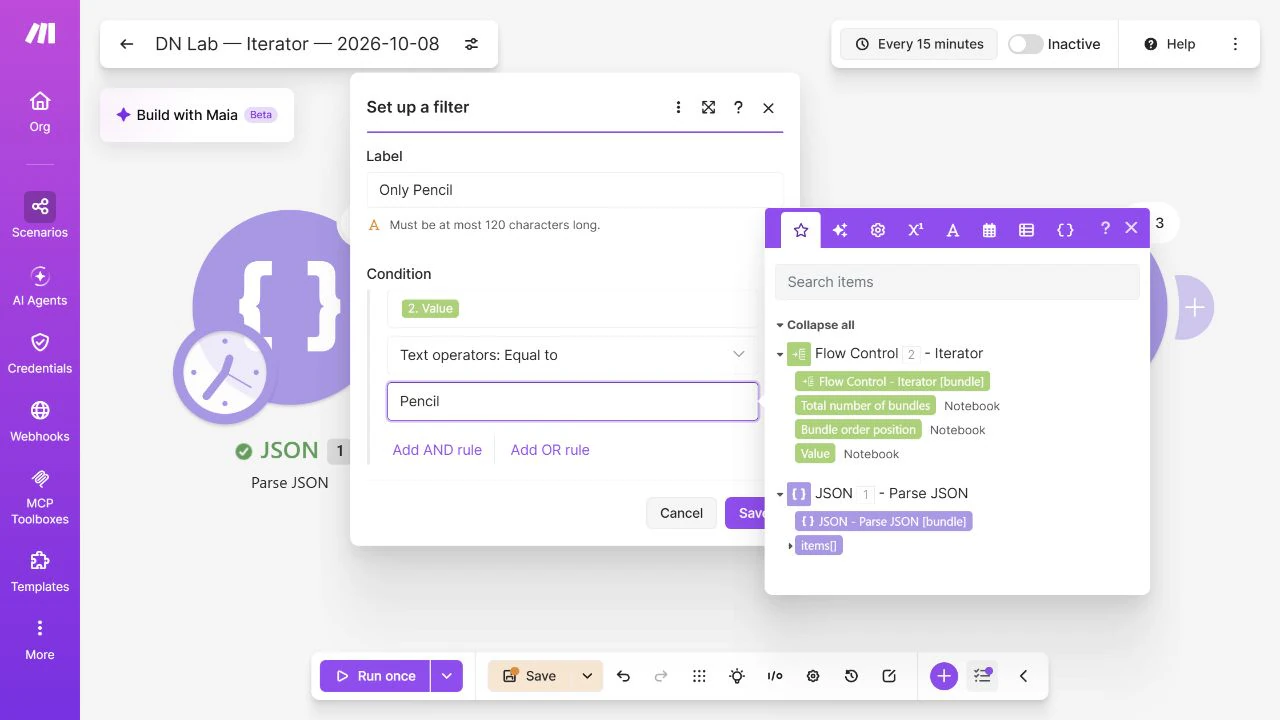
Click the connection between Iterator and Tools—the line/wrench control on the canvas—and open Set up a filter. Putting the filter after Tools would be too late to prevent that action.
Give it the label Only Pencil, then set one condition:
- Left value: select the Iterator’s Value token from the mapping panel.
- Operator: Text operators → Equal to.
- Right value: type
Pencilas plain text.
Save the filter. The left side changes with each item; the right side is the specific value you want. Typing the word Value on the left creates literal text, not a connection to your data.
Do not add a router for one condition. A filter on the connection already controls this path.
Check both the accepted and rejected items
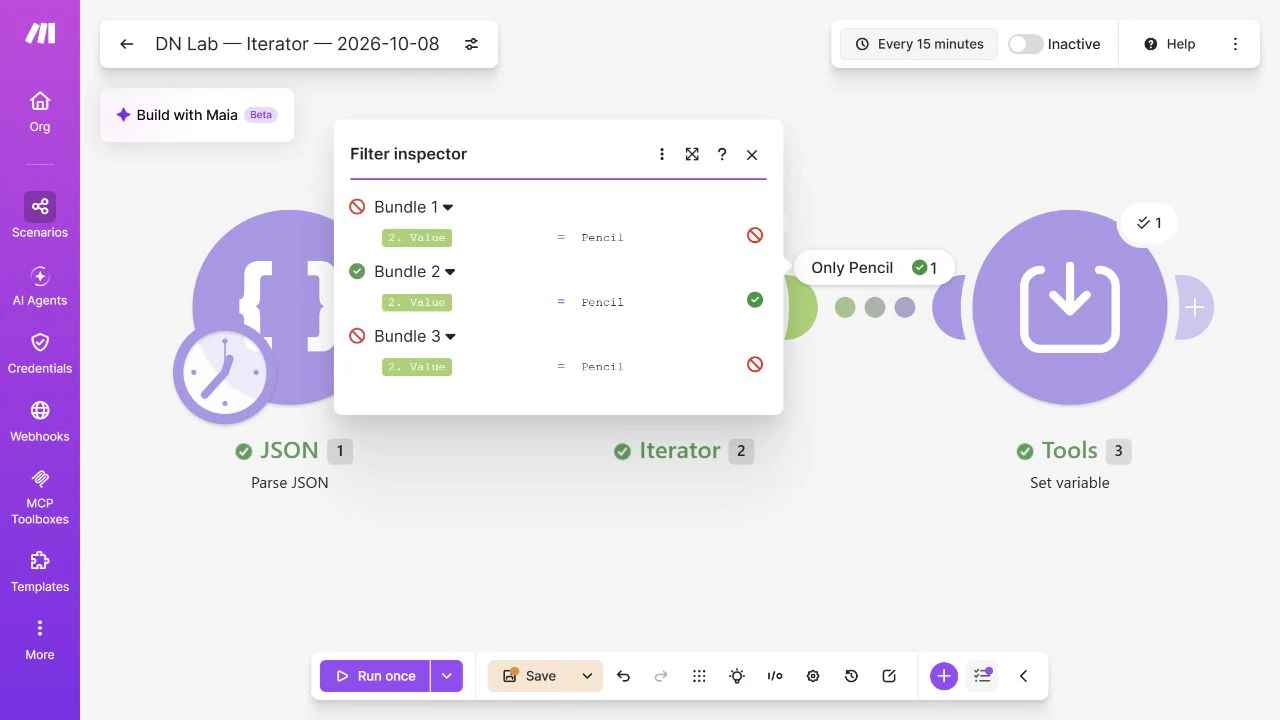
Click Run once. Open Tools’ result bubble: it should have one operation, whose item output is Pencil.
Now open the filter’s inspection bubble on the connection. Check the three bundles:
| Incoming value | Equals Pencil? | Tools runs? |
|---|---|---|
| Notebook | No | No |
| Pencil | Yes | Yes |
| Folder | No | No |
The two blocked bundles are the expected result, not two scenario failures. But if every bundle is blocked, the process has delivered nothing: inspect the condition before assuming a successful run means a successful task.
Use the right kind of comparison
For your real scenario, replace this condition with a field and value that you can recognize in an actual test output. A status such as approved is text; a quantity such as 3 should use a numeric operator if you want “greater than 2.” Alphabetical comparisons are not number comparisons.
Make describes Exists as checking whether a field is filled in. That is different from checking that its text equals a particular word, and a filled-in field does not prove the content is useful. Decide what an acceptable value means for your task; do not assume an empty value will pass this check.
Add AND only when all the conditions must be true, for example status is approved and an email field is filled in. Use OR when either alternative is sufficient. Test the boundary cases before connecting a consequential action; this exercise needs just one condition.
If nothing passes—or too much passes
Nothing passes: open the upstream output and compare the actual value with the right-hand text. A different case, a space or a different field can explain the mismatch. Map the token from the correct module rather than rewriting the condition blindly.
All items pass: check that you saved the filter on the connection leading to the action you are inspecting. A filter elsewhere does not protect this route.
The action still happened: make sure the filter is before it and inspect the latest run. Filters do not undo actions from earlier runs.
The list is empty: there are no item bundles to check. Tools should not run; a filter does not create a missing item.
Save the scenario and confirm Inactive. In a real automation, a filter prevents work after its position; it does not erase the credits or actions already used upstream. Keep a small test and verify usage before enabling repeated runs.
Sources and useful links
- Make filtering — connection filters, operators and combined conditions.
- Iterator — why each list item reaches the filter as a separate bundle.
- JSON app — input and data structure for this manual example.
- Scenario variables — the Tools output used to inspect accepted values.
- Make credits — distinguish skipped downstream work from work already executed.