How to show different questions in Google Forms based on an answer
Use Google Forms sections to send people to the right follow-up question, avoid an unwanted second branch, and test both paths before sharing.
In this guide
An online workshop attendee should not have to answer a question about an in-person practice table. In Google Forms, you can ask how someone will attend, then send them to the relevant follow-up.
Forms does this through sections: separate pages of questions. It does not instantly hide one field on the current page. The route changes when the respondent clicks Next.
You will build two routes, test that each shows only its own question, and confirm both reach submission. Use a desktop browser and a form you can edit. Start with a blank practice form if your existing one is collecting real answers; these native features need no add-on or paid upgrade.
Plan three sections before adding conditions
Use this small example, or replace its questions with your own equivalent. The important part is keeping the routing question before the two alternative sections.
| Section | Question | Answer choices | Where it ends |
|---|---|---|---|
| 1: Workshop attendance | How will you attend? | Online; In person | The selected destination |
| 2: Online attendance | Would you like a recording? | Yes; No | Submit form |
| 3: In-person attendance | Which practice table would you join? | Forms; Spreadsheets | Submit form |
This example collects preferences only; it does not send recordings, reserve seats or confirm a booking.
Build the questions and sections
Open Google Forms and choose Blank form, or open your practice form. Set the form title to Workshop attendance and add a short description explaining its purpose.
- In the first question, enter How will you attend? Choose Multiple choice, add Online and In person, and turn on Required.
- With that question selected, click Add section on the right-hand toolbar. Its icon is two horizontal rectangles.
- Name the new section Online attendance. Select its heading, then click the Add question plus. Add Would you like a recording? as a required Multiple choice question with Yes and No.
- With that question selected, add another section. Name it In-person attendance, then add Which practice table would you join? with Forms and Spreadsheets as required choices.
Your form should now have three sections, with one question in each. If a question landed in the wrong section, use its drag handle to move it into the correct one before adding routes.
Choose a destination for each answer
Return to How will you attend? and select the question. Open its bottom-right three-dot menu and choose Go to section based on answer.
Destination menus appear beside the answer choices. Set them explicitly:
- Online → Go to section 2 (Online attendance).
- In person → Go to section 3 (In-person attendance).
The option is available for Multiple choice and Dropdown questions, not Short answer or Checkboxes. Multiple choice is useful here because one person selects one route. A required choice prevents an unanswered routing question from falling through to a default path.
Stop the first branch from continuing into the second
Scroll to the bottom of section 2. Change After section 2 from Continue to next section to Submit form.
This is the easy-to-miss step. Without it, online attendees can finish their recording question and then see the in-person section too. Section 3 is the final section, so its last page ends with Submit. If you later add another section after it, review that ending again.
Wait for the saved status. You now have two complete routes, not just two destinations.
Test both routes through submission
For these two practice submissions, open Settings → Responses and leave Limit to 1 response off. Otherwise, a form you have already answered may block the second route test. Note whether you need to restore that rule after testing; do not relax it on a live form just to run this example.
Click Publish and review who can respond. For a non-sensitive practice form, use Anyone with the link and publish without notifications. If it was already published but closed, turn on Published → Accepting responses and Save. Use Copy responder link to open it in a new tab, keeping the editor open for checking results. A restricted work or school form should keep the audience appropriate to its data.
Before choosing anything, click Next. The required-choice message should keep you on the first page.
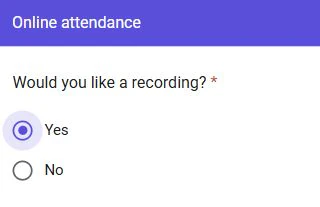
Then choose Online, click Next, and answer Yes to the recording question. You should see a Submit button on this page, not a request to complete the in-person question. Submit and wait for confirmation.
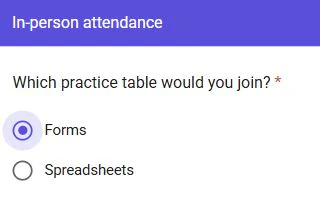
Open the original responder link again, choose In person, then Next. Select Forms and submit. This path should show the practice-table question without asking about a recording.
In the editor’s Responses tab, expect two new responses. Use Individual to check each submission: its attendance choice and the relevant follow-up should be filled, while the skipped question should be empty. Required questions in the skipped section should not block the other route.
If the path is wrong
If both follow-ups appear, check After section 2 → Submit form. If the wrong follow-up appears, check the destination beside the original answer, not just the menu at the bottom of section 1.
If Go to section based on answer is missing, confirm the routing question’s type. If a required question blocks a route, check whether it was placed in the first section or accidentally included in that route.
For a rehearsal, finish by opening Published, turning off Accepting responses, and saving. Restore Limit to 1 response if your intended setup requires it. Your two test answers remain available. When the form is ready for real use, reopen it deliberately and share its responder link. You can customize the closed-form message while it is unavailable.
Sources and useful links
- Google Forms — open an existing form or a blank practice form.
- Show questions based on answers — supported question types, section destinations and ending a route.
- Publish and share a form — choose the responder audience and distribute the correct link.
- View and manage responses — inspect the two submissions and stop the rehearsal.