How to add a file upload to Google Forms
Collect one PDF through Google Forms, explain the Google sign-in requirement, limit file type and size, and verify the uploaded file in the saved response.
In this guide
Add a File upload question to collect a document with a Google Forms answer. Respondents must sign in to Google, and the files are stored on the form owner’s Drive. If your audience cannot use a Google account, decide that before building the upload form.
We will collect one workshop PDF, no larger than 10 MB, and check that it reaches the saved response. You need an editable Google Form, available Drive space and a harmless PDF for testing. Use an individual account or an account whose organization permits uploads. The current desktop controls were checked on October 8, 2026.
This is a named document-submission process, not an anonymous survey. The upload screen tells respondents that their Google identity information is recorded when they upload and submit. Do not promise anonymity just because you disabled ordinary email collection.
1. Check whether file uploads fit your audience
Open your form in its editor. A work or school administrator can restrict this feature; Google also disables file-upload questions when the form is stored in a shared drive or an administrator enables the relevant data-loss-prevention restriction.
If File upload is unavailable, check the form’s location and ask the administrator what is permitted. Do not move an organization’s form into a personal account to bypass its policy. For respondents without Google accounts, use a form tool that explicitly supports sign-in-free uploads; our Tally versus Google Forms comparison explains that decision.
For this small example, a normal form in the owner’s Drive is sufficient. You do not need to buy separate hosting, a database or an automation subscription.
2. Add one clearly limited upload question
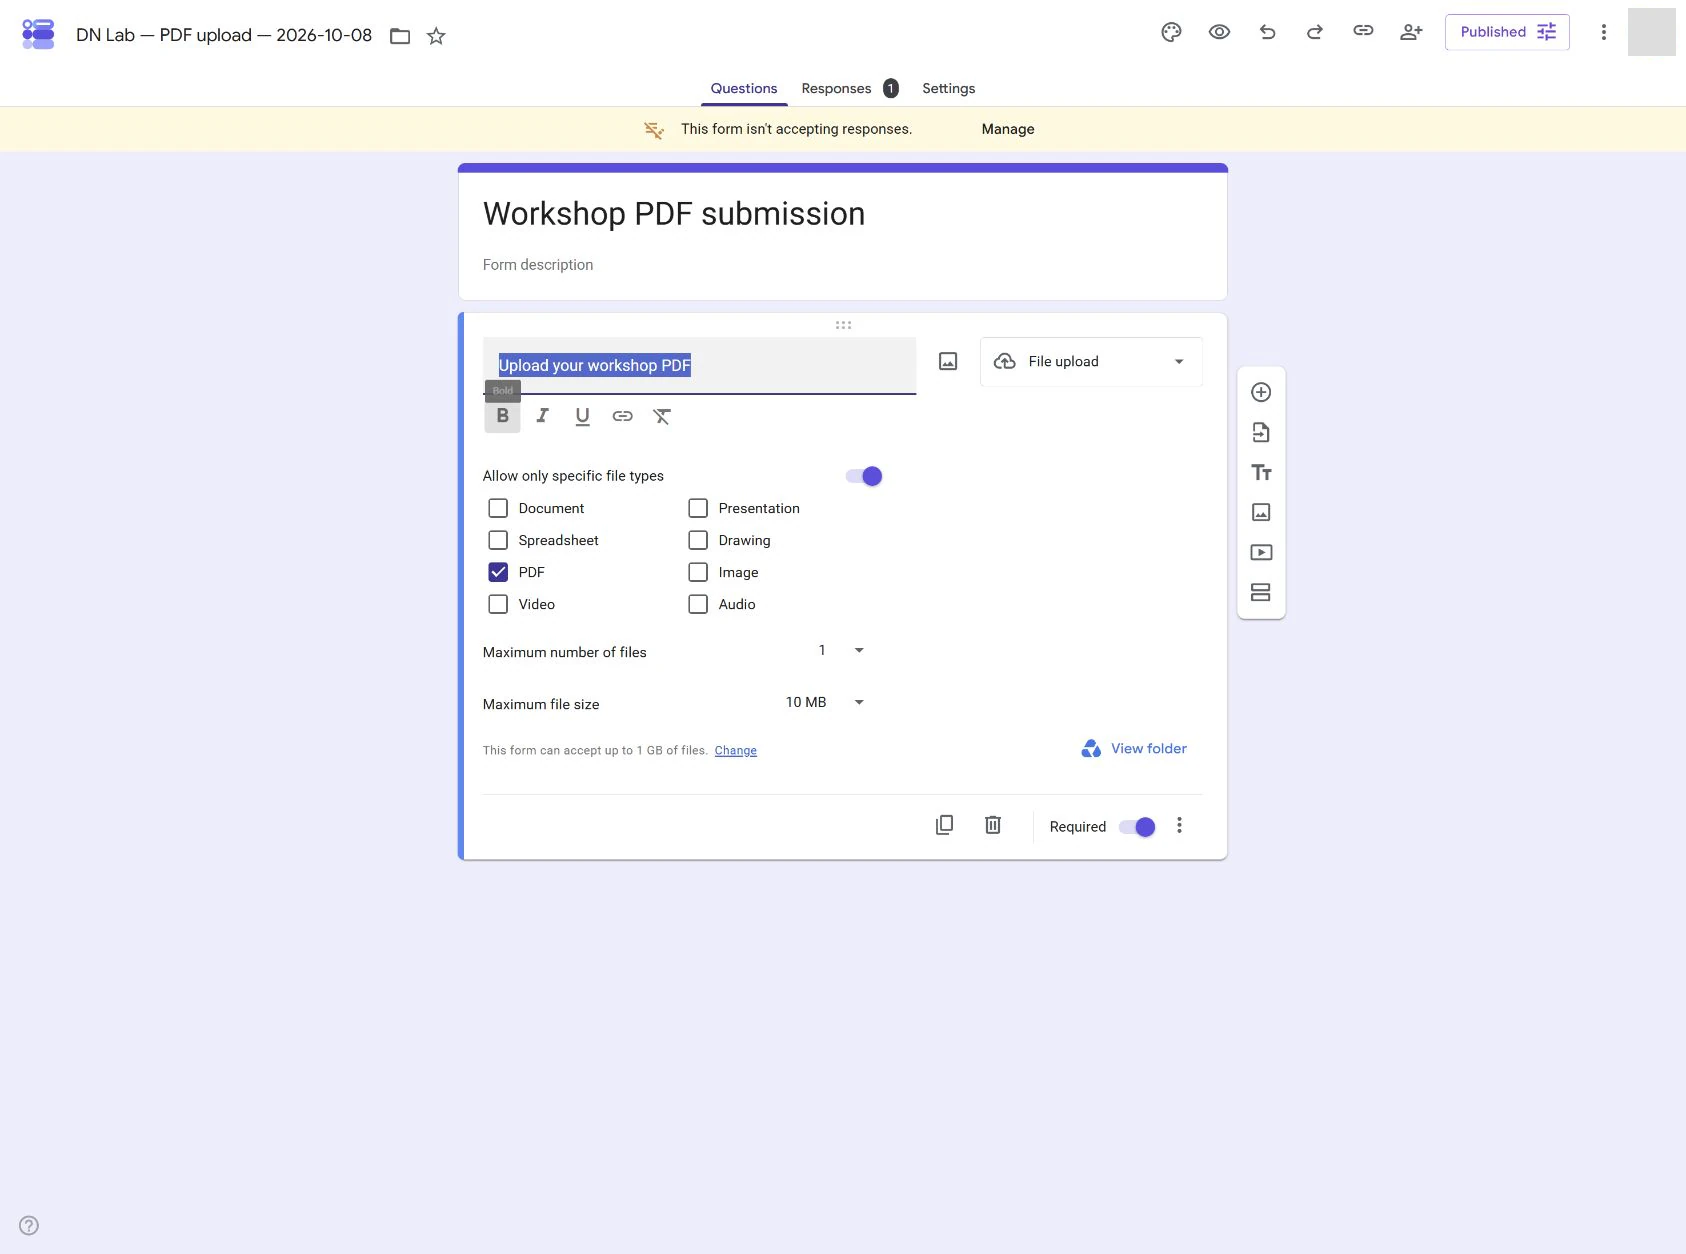
Click the + button beside the questions. Set the question title to Upload your workshop PDF, then open the question-type menu and choose File upload.
Google shows a notice explaining that uploads go to the owner’s Drive and that respondents must sign in. Read it, then click Continue if that matches the process you intend.
Set these controls:
- Allow only specific file types: on, with PDF selected.
- Maximum number of files: 1.
- Maximum file size: 10 MB.
- Required: on.
These settings make the request predictable: one document, a known type and a modest size. Use a larger limit only if the actual document requires it.
In the form description, explain what to upload, why you need it and who will review it. For a test, say Upload a harmless sample PDF. Do not include personal or confidential information. For real use, replace that with your actual document requirements and handling information.
3. Publish and submit a harmless test file
Click Publish, review who can respond, and publish for the intended audience. Copy its responder link using the link button, then open that link in another tab. It should show your upload question and the Google sign-in requirement.
Click Add file, choose Browse, select a small test PDF and wait until its name appears in the form. Then click Submit. Selecting a file is not the same as submitting the answer: wait for the confirmation page.
Back in the editor, open Responses → Individual. Your test answer should include the file. Open that file and check that it is the document you sent. The upload question also provides a link to the storage folder; use it to understand where future documents will go.
Try a harmless TXT file as a second check. A PDF-only question should reject it with an unsupported-file message. You can then cancel the selection. Do not upload a real confidential document just to test restrictions.
4. Understand the storage and access
The question’s per-file limit and the form’s total upload allowance are separate. Small permitted files can still exhaust available space when many people submit. Check the total upload setting shown under the question and your account’s Drive capacity before a large collection.
Keep the form, stored files and any linked spreadsheet available only to the people who need them. An exported answer or shared file link can create another access route; do not assume the upload remains private everywhere merely because it began in Forms.
If you are collecting personal documents, decide your access and retention process before inviting people. A form setting alone does not establish an appropriate legal basis or secure every later copy.
If the upload fails
Sign-in is required: that is expected for this question type. Embedding the form in a website does not remove the requirement.
The file is rejected: check its actual type, size and the configured number of files. Renaming a .txt file to .pdf does not convert it into a PDF.
The file was selected but no response appears: confirm you clicked Submit and reached confirmation. Check the same form’s Responses tab, not only a different Drive folder.
The owner cannot accept more files: check available Drive space and the form’s total upload allowance. Stop collection while resolving capacity rather than inviting submissions you cannot receive.
Close the test without deleting it
When finished, click Published, turn Accepting responses off and Save. Refresh the responder link and confirm it shows a closed-form message. Keep the harmless test answer if you need it as a reference; closing collection does not delete the saved file.
You now have the complete check: a permitted PDF reached a stored response, a wrong type was rejected, and the direct responder link can be closed. Recheck those points after changing upload restrictions or account policy.
Sources and useful links
- Google Forms question types — uploads, sign-in, storage and restricted availability.
- Publish and share a form — access for the intended respondents.
- Manage responses — checking answers and closing collection.
- Google storage — shared account storage and what happens when capacity runs out.