How to make a Google Forms order request
Collect a simple item request, whole-number quantity and reply email in Google Forms, then verify the answer without promising payment, stock or a confirmed order.
In this guide
Google Forms can collect an order request; it does not turn that request into a paid, confirmed order. It works well for a small, manually checked process: someone chooses an item and quantity, you check availability, then reply with the next step.
We will make a notebook-request form with three required fields and check that a valid request arrives. It collects no payment or delivery address and does not reserve stock. You need a Google account, permission to create a form, and a small list of items you can actually supply. The current desktop interface was checked on October 8, 2026.
1. Explain what the request does
Open Google Forms, choose Blank, and give the file a recognizable name such as Notebook requests. The file name helps you find it on Drive; the form title is what visitors see.
Set the form title to Notebook request. In its description, say:
Choose a notebook and quantity. The person handling requests will use your reply email to confirm availability and the next step. This form does not collect payment or reserve an item.
Use wording that matches your actual process. If you have a confirmed price, currency, delivery area or collection method, explain it clearly before asking people to submit. Do not put an estimated or outdated price into a live order form as though it were confirmed.
2. Add three required questions
Each question has a type menu on its right. Choose the type below and turn on Required at the bottom of that question.
| Question | Type | Settings |
|---|---|---|
| Choose a notebook | Multiple choice | Plain notebook; Dotted notebook; Required on |
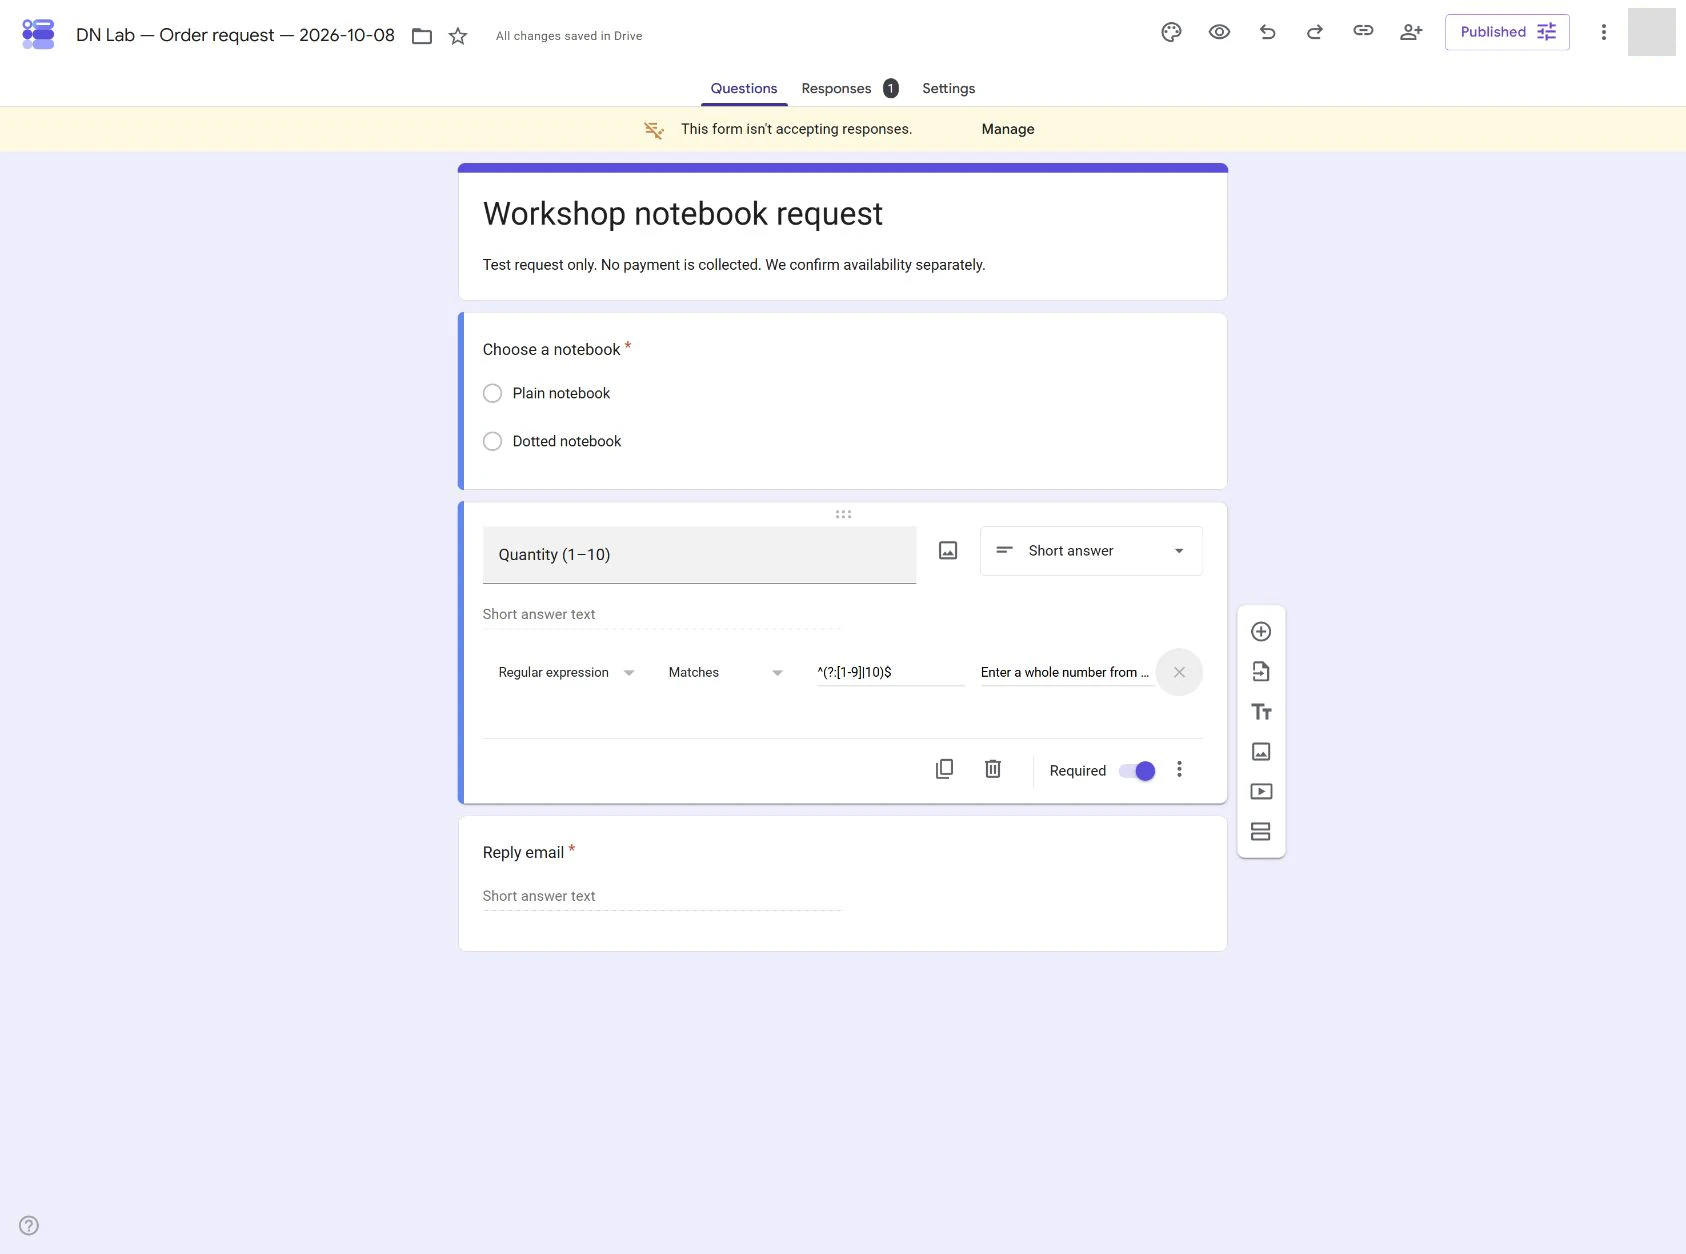
| Quantity (1–10) | Short answer | Required on; whole-number validation below |
| Reply email | Short answer | Required on; Text → Email validation |
Use the + button beside the questions to add the second and third fields. Replace the example notebooks with your own real choices when you are ready to use the form. Avoid an open “Other” item choice if you cannot fulfil arbitrary requests.
For Reply email, open the question’s three-dot menu, choose Response validation, then select Text → Email. This checks the address’s shape; it does not verify that the person owns the mailbox or will receive your reply.
You do not need to collect a name, phone number and full address just to discuss availability. Add personal fields only when the next step actually needs them.
3. Accept whole quantities, not 1.5 notebooks
For Quantity (1–10), open the question’s three-dot menu and choose Response validation. Select Regular expression → Matches, then paste:
^(?:[1-9]|10)$A regular expression is a rule describing allowed text. This one accepts the whole numbers 1 through 10 and rejects decimals, zero and larger numbers. You do not need to learn the notation to use this exact rule.
Enter a useful custom error message, such as Enter a whole number from 1 to 10. Keep Required on; validation alone should not allow someone to omit the quantity.
Why not just choose Number → Between? It can accept a value such as 1.5. The rule above matches this particular request’s whole-item requirement. If you change the allowed quantity, update the question label and rule together.
4. Publish and test the complete request
In Settings → Responses, decide how people will supply their contact address. For this example, keep Collect email addresses → Do not collect because the required Reply email question already supplies the address. Verified email collection instead requires a Google sign-in; do not accidentally impose that on a public request form.
Under Settings → Presentation, keep View results summary off so respondents cannot see other people’s requests or reply addresses. Set a confirmation message such as:
Your request has been received. We will review availability and reply. This is not yet a confirmed order.
Click Publish, check responder access for your intended audience, and publish. Copy the responder link using the link button. Do not send the private editor address.
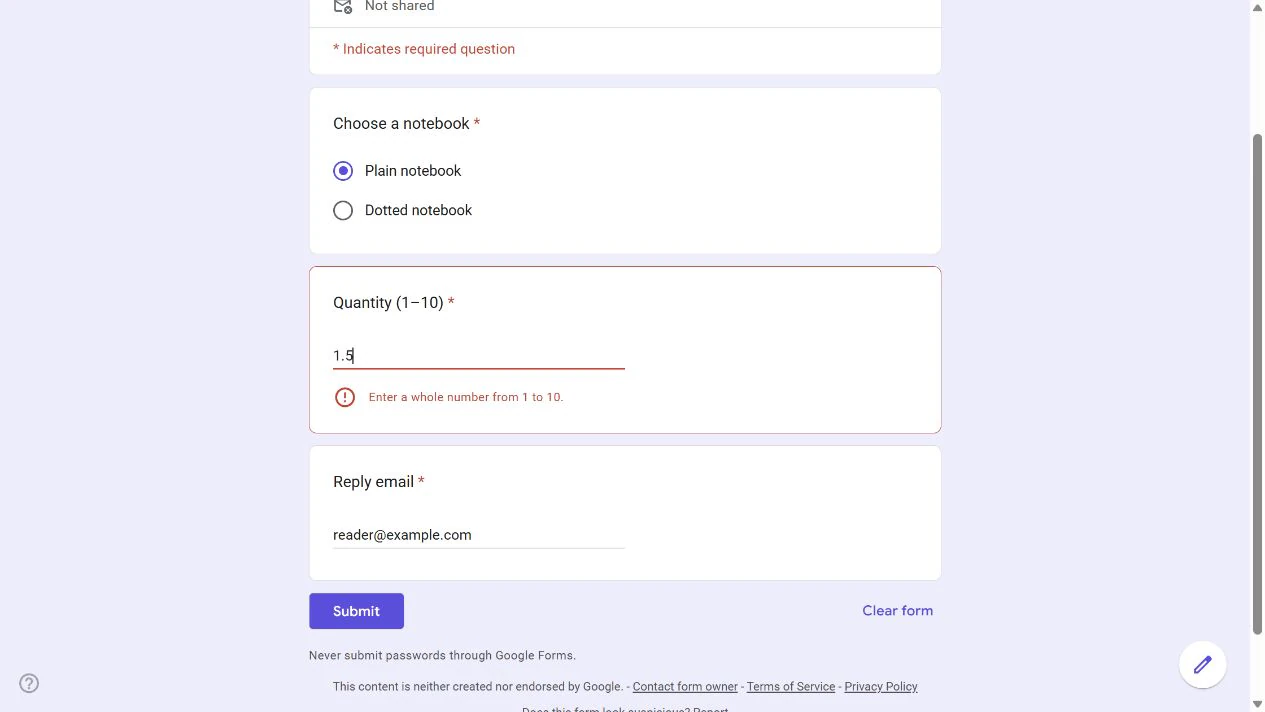
Open the responder link in another tab. Choose Plain notebook, enter 1.5, and use a harmless test address that you control. Submit. The quantity should show an error, and the form should remain unsubmitted. Change the quantity to 2 and submit again. You should now see the confirmation.
Back in the editor, open Responses → Individual. Confirm that the saved request contains the chosen notebook, quantity 2 and reply address. If you use a linked spreadsheet, verify its row too. Forms can send answers directly to Sheets without an extra automation service.
5. Review the request before confirming it
Treat each saved answer as something to check, not a completed sale. Verify availability and the requested quantity, then reply using your normal email process. Share the confirmed price and any payment or fulfilment instructions only after you have checked them.
Google Forms does not automatically maintain stock, take payment or guarantee that simultaneous requests stay below your available quantity. If you need a real checkout with payment confirmation and inventory, use a suitable shop system rather than adding those promises to this form.
For a temporary collection, close the form when you are done: Published → Accepting responses → off → Save. Check the responder link shows closure and that earlier requests remain. Closing the form does not send cancellation emails to people who already submitted.
Sources and useful links
- Create a Google Form — editor basics and questions.
- Response validation — email, numbers and text-pattern rules.
- Publish and share — responder access, email collection and confirmation settings.
- Manage responses — finding answers and closing collection.